Your first project
Getting started with your first Quary project should be done in the Visual Studio Code extension. The extension is the best way to get started with Quary, as it provides a lot of helpful features to make your life easier, namely a lovely onboarding experience. Before you can get started though, there are a few things you need to do.
Selecting a database
If you haven't installed it yet, you can find details on how to do so here. Once you have done so, there are a few other requirements to think about before you can get started. Once you have done that, you should open the Visual Studio Code in the folder that you want to create your project in. The folder has to be empty before you get started.
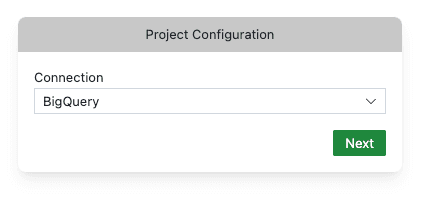
After a successful installation and you have an empty folder, you should be able to run the following command in the command palette QUARY: Initialise project ✨, you can open the command palette by pressing CTRL + SHIFT + P on Windows or CMD + SHIFT + P on Mac

If you click Next, Quary will ask you to sign in to your Google account and copy a code into the extension. This is so that Quary can access your BigQuery projects and datasets.
Choosing a place for your Quary project
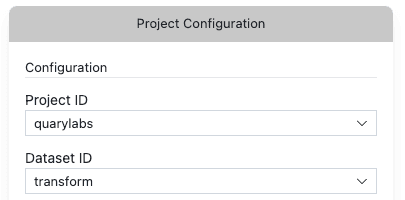
Once you are signed in, Quary will retrieve all your projects and datasets and display them. This is the project and dataset where Quary will create the models for your project. You will need to create a project/dataset before you can continue. We recommend you create a new dataset for each project you create and only for Quary.

Importing data
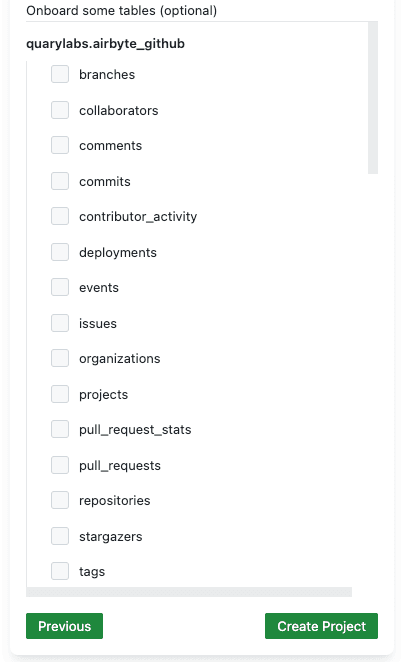
Once you have selected a dataset, you will be asked to import data. This is where you will select the data you want to use for your project. You can select multiple tables, views, and even other projects. None of it needs to be in the same dataset. In fact, we recommend you keep your data in separate datasets to your Quary project. Here you can see our example project where we are pulling data from GitHub through AirByte.

Once you are happy with the data you have selected, you can click Create Project and Quary will create your project.
Your created project
Once you have created your project, you should see the following
It will include all the sources that you have selected as well as the staging models that we recommend you reference in your models rather than the sources directly. With the data imported, you can now start writing your models.
Before you jump into the pieces, let's just have a brief look at the pieces that make up a project. Don't spend to long it as it will all become clear as you go through the examples.
quary.yaml file
The quary.yaml file defines how the project is built, e.g. what sort of database to use and the details to connect to. The default will run the project in memory.
seeds folder
The seeds folder can be used to populate the database with some initial data with information from .csv files. See the examples for the raw data that is uploaded.
So that the data can be used in the project, the data is uploaded to the database and then the data is transformed into a model.
models folder
The models folder contains the models that are used to define the data in the project. See the examples for the models that are used in the project. These are views of the underlying data which can be used to reproject the values into something useful.
Models tend to have two components. The first is the SQL which defines the SQL that is used to create the model. The second is a description of the model which is included in project yml files. For example, in the sample project, shifts_by_month is defined as follows and is used to understand the number of shifts by month for each employee.
SELECT
    employee_id,
    strftime('%Y-%m', shift_date) AS shift_month,
    COUNT(*)                     AS total_shifts
FROM q.stg_shifts
GROUP BY employee_id, shift_month
The model uses an underlying model stg_shifts which is defined in the stg_shifts.sql file. With the q. notation models can refer other models in the project.
In addition to the .sql definition, the model also contains information in schema.yaml
models:
  - name: shifts_by_month
    description: 'Contains the total number of shifts for each employee by month.'
    columns:
      - name: employee_id
        tests:
          - type: not_null
          - type: relationship
            info:
              model: stg_employees
              column: employee_id
      - name: shift_month
      - name: total_shifts
        tests:
          - type: unique
          - type: gte
            info:
              value: 0
which defines the columns that are in the model and the tests that are run on the model.
tests folder
The tests folder contains SQL tests to be run against your models.